Raspberry Funnycake

This recipe was under D for desserts in the recipe box.
I was immediately drawn to it because of it's name. I'd never heard of a funnycake before and wondered what it could be. I glanced at the ingredients and agreed that it seemed like a strange dessert item. Why bake a cake inside of a pie crust?!
My mom had never made it before, but her mother (my grandma) used to cook with Bisquick all the time. She thinks that's the reason she cut this out of a newspaper and added it to her collection of (strange) recipes!
I made a few changes as I baked it because some things were just a little too "funny" for my liking, but feel free to do the same or bake it as it is. Here's the original:
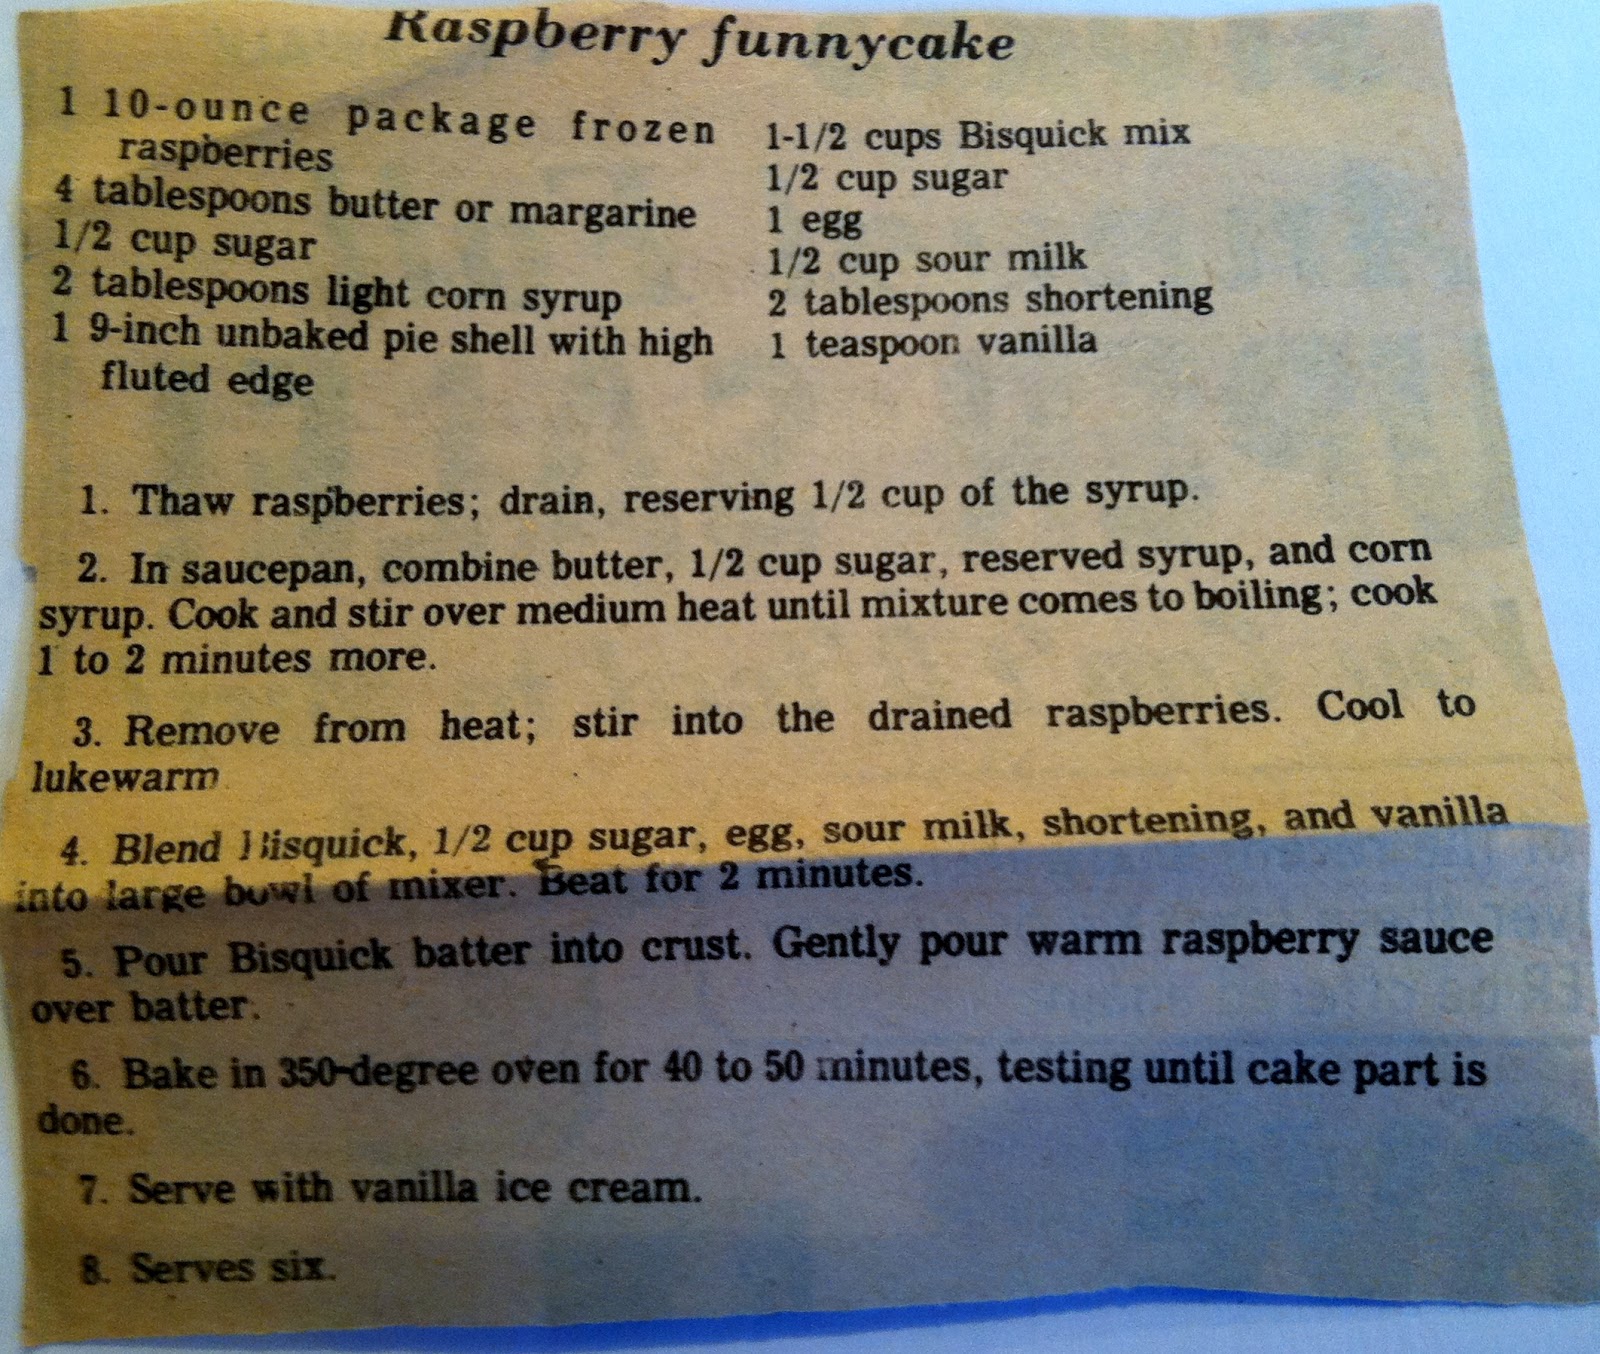
Raspberry
Funnycake
1
10- ounce package frozen
raspberries
4
Tablespoons butter or margarine
½ Cup
sugar
2
Tablespoons light corn syrup
1
9-inch unbaked pie shell with high
fluted edge
1&
½ Cups Bisquick mix
½ Cup
sugar
1
Egg
½ Cup
sour milk
2
Tablespoon shortening
1
Teaspoon vanilla
1.
Thaw raspberries; drain, reserving ½ cup of the syrup.
2.
In saucepan, combine butter, ½ cup sugar, reserved syrup and
corn syrup. Cook and stir over medium heat
until mixture comes to
boiling; cook 1 to 2 minutes more.
3.
Remove from heat; stir into the drained raspberries. Cool to lukewarm.
4.
Blend Bisquick, ½ cup sugar, egg, sour milk, shortening, and vanilla into
large bowl of mixer. Beat for 2 minutes.
5.
Poor Bisquick batter into crust. Gently pour warm raspberry sauce over
batter.
6.
Bake in 350-degree oven for 40 to 50 minutes, testing until cake part is done.
7.
Serve with vanilla ice cream.
8.
Serves six.
The ingredients were fairly easy to find. However, I didn't have frozen raspberries, corn syrup, or an unbaked pie shell on hand. I was able to find all of the items easily in my local grocery store. You might be thinking the same thing I did . . . sour milk?! Unfortunately, I'm not brave enough to try that one out (nor did I have sour milk on hand) so I just used regular milk. Hopefully that wasn't supposed to be the funny part of the cake!

For the uncooked pie shell I found a package of two in the frozen aisle near the ice cream. By "fluted" they mean those bumps around the top edge of the crust. (The ones you usually make with your fingers when you make a pie crust from scratch) They generally only come in "deep dish" variety which is okay, you'll need all the room you can get!
Let's get started. Preheat your oven to 350 degrees. First, you'll need to thaw out those raspberries. If you don't have the time to let them thaw out in the refrigerator then you can place them in a microwave safe bowl and put them on the "defrost" setting for about 3 minutes. Once the berries are no longer frozen, get a strainer (any size will work) and transfer the berries into it. Be sure to place another bowl underneath it to avoid raspberry juice getting all over your kitchen!

Once you have drained at least a 1/2 cup of the raspberry juice (syrup), add it to a medium sized sauce pan along with the butter, 1/2 cup of sugar, and the corn syrup.

Cook this on low to medium heat (depending on the size of your burner) while stirring, until it starts to boil. It has a wonderful aroma and will make your house smell delicious! Once the mixture is boiling turn the heat down as low as it can go and cook for another 2 minutes. Your mixture should end up like this:

Pour this mixture into the thawed raspberries in another bowl and set it aside to cool while you continue with the rest of the recipe.

Next, add the Bisquick, 1/2 cup of sugar, egg, (sour) milk, shortening, and vanilla into a mixing bowl. You can use a hands free mixer for this, but I just used the electric beater and it worked fine. For the shortening I used Crisco vegetable shortening.

Turn your mixer on and blend the ingredients together for about 2 minutes.You should end up with a somewhat loose batter that has a slight brown color to it (from the vanilla).

When the Bisquick mixture is ready go ahead and pour it into the bottom of your pie crust. The pie crust I bought comes in a foil tin which is okay to put right in the oven, but I highly recommend cooking it on top of a cookie sheet with a lip because the juices will spill over and no one likes the smell of burning raspberry juice in the oven!

It seems weird pouring a cake batter into a pie crust and it is, but trust me...it doesn't taste the way it looks! Once the Bisquick mix is in the pie crust, go ahead and pour the raspberry mixture over it. The crust should fill up right to the edge.

Such a pretty pie/cake thingy! Now it's time to bake. Again, put the pie on a cookie tray with a lip to be sure it doesn't bubble over while cooking. Place it in your 350 degree oven and set your timer. Mine cooked for longer than 50 minutes. It was actually 1 hour and 5 minutes, but it may depend on your oven. You can tell when it's done by inserting a tooth pick into the center. It's cooked when it comes out clean.

Yum! I'm not completely sure why they call it a "funnycake". Maybe it's the fact that it's a cake within a pie crust, maybe it's the sour milk, but I think it's because the cake ends up baking opposite of how it is put in the pie crust to bake! The raspberries end up on the inside and the cake becomes the crust on the top. Either way, it was quite good!

I gave this recipe a 5 out of 5 on the yummy scale!

It definitely had a few strange ingredients and methods of cooking, but overall I would definitely recommend trying this fruity dessert!
No comments:
Post a Comment